
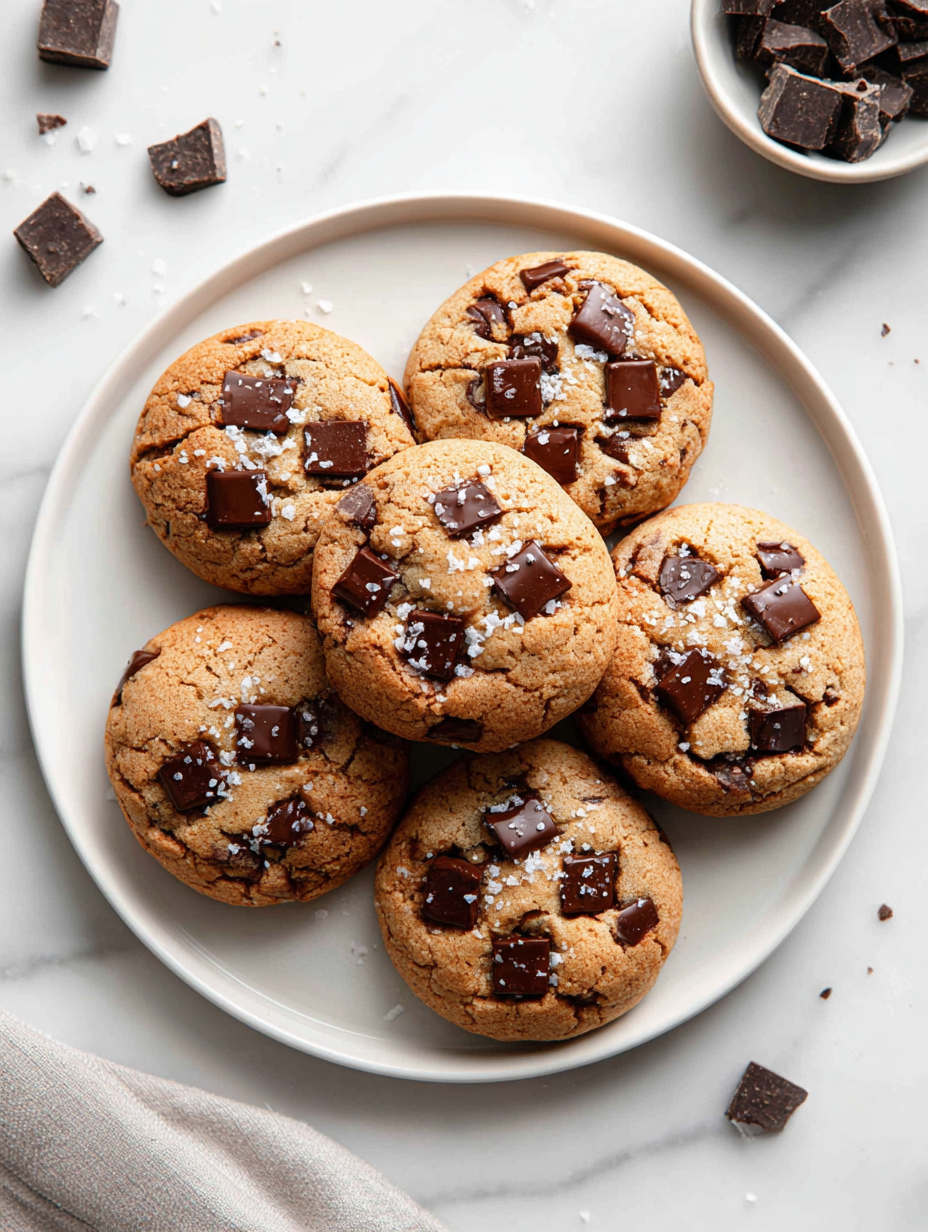
Many people rush through making chocolate chip cookies, but I’ve found that giving the dough a good chill really deepens the flavor and improves the texture. It’s like letting the ingredients get to know each other better, developing a richer, more complex bite with each cookie. That patience, I promise, makes all the difference when you finally take that first warm, gooey bite.
Chilling isn’t just about flavor—it’s also about control. Cold dough spreads less in the oven, giving you those perfectly thick, chewy centers with slightly crisp edges. Plus, I love how it rewards you with a little extra prep time that turns into a quiet moment in the kitchen, listening to the fridge hum as the dough rests. When you bake these after a good rest, they come out just right—crackly edges and chewy middles that make you want to grab another.
Focusing on the overlooked importance of chilling cookie dough for enhanced flavor and texture, revealing how patience in the fridge transforms each bite into a richer, more complex experience.
The story behind this recipe
- I grew up watching my grandmother bake batches of cookies every Sunday afternoon. Her secret was always a pinch of patience, letting the dough rest in the fridge overnight. That slow chill seemed to unlock a depth of flavor you couldn’t get otherwise, and the cookies came out with a satisfying chew and a caramel note I still chase today.
- One rainy afternoon, I decided to tweak her classic recipe—adding a touch of flaky sea salt and a splash of vanilla. The dough felt richer and more forgiving, and the cookies baked up thick and gooey, just like I remembered. Since then, I’ve kept that tradition alive, knowing the quiet magic of a well-rested dough makes all the difference.
- heading
- The story behind this recipe
Key ingredients and tips
- Butter: I use unsalted butter, softened but not melty, for a rich, creamy base. If you prefer a nuttier flavor, try browned butter—adds a smoky depth that’s irresistible.
- Granulated Sugar: It’s the sweet backbone—crisp and sweet, with a slight crunch. For a softer cookie, swap half for brown sugar; it adds moisture and a caramel note.
- Eggs: Large eggs give structure and moisture. For a chewier cookie, use an extra yolk—adds richness and helps with spreading less.
- Vanilla Extract: I always opt for good-quality vanilla—brightens the dough with a floral, lemon-bright aroma. A splash makes all the difference in depth.
- Chocolate Chips: I love using a mix of dark and milk for complexity, but if you want a more intense chocolate punch, go for higher cocoa content. Watch out—they ooze and melt into pockets of gooey joy.
- Flour: All-purpose works perfectly, but I sometimes mix in a bit of bread flour for extra chew. Too much, and it can make the cookies dense—test small batches first.
- Baking Soda: This is what gives the cookies lift and a bit of crackle on top. If you forget it, the cookies will be flatter and less airy—so don’t skip it.
Spotlight on key ingredients
Chocolate Chips:
- I love using a mix of dark and milk for complexity, but if you want a more intense chocolate punch, go for higher cocoa content. Watch out—they ooze and melt into pockets of gooey joy.
- Butter: I prefer unsalted, softened but not melty, for a rich, creamy base. If you brown it first, it adds a smoky depth that’s irresistible.
Butter:
- Flour: All-purpose is standard, but a touch of bread flour adds chew. Too much, and cookies get dense—test small batches first to get your perfect chew.
- I use unsalted, softened but not melted—watch for a faint nutty aroma when browned, which adds richness.
Notes for ingredient swaps
- Dairy-Free: Swap butter for coconut oil or vegan margarine. Expect slightly different melting and richness, but still delicious.
- Sugar Alternatives: Use honey or maple syrup instead of granulated sugar. Will add moisture and a subtle flavor twist.
- Egg-Free: Replace eggs with mashed banana or flaxseed meal mixed with water. Cookies may be a bit denser and less chewy.
- Chocolate Variations: Dark chocolate chunks or white chocolate chips can replace traditional chips. Adjust sweetness accordingly.
- Flour Options: Whole wheat or gluten-free blends work, but may alter texture and density. Use a bit less or adjust baking time.
- Add-ins: Nuts, dried fruits, or oats can be added or swapped out for variety. Keep in mind they affect dough consistency.
- Vanilla Extract: Substitute with vanilla bean paste or omit for a more neutral flavor. The dough will lose some depth.
Equipment & Tools
- Mixing bowl: To combine ingredients thoroughly.
- Whisk and spatula: To cream butter and mix ingredients.
- Baking sheet: To hold the cookies while baking.
- Parchment paper: Prevents sticking and makes cleanup easy.
- Cooling rack: To cool cookies evenly and prevent sogginess.
Step-by-step guide to cookies
- Gather your equipment: a mixing bowl, a whisk, a spatula, a baking sheet, parchment paper, and a cooling rack.
- Preheat your oven to 180°C (350°F). Line the baking sheet with parchment—no sticking, no fuss.
- In the mixing bowl, cream together 113g (1/2 cup) softened unsalted butter and 100g (1/2 cup) granulated sugar until light and fluffy—about 2-3 minutes with a spatula or whisk.
- Add 1 large egg and 1 tsp vanilla extract. Mix until just combined—watch for a glossy, slightly thickened mixture.
- In a separate bowl, whisk together 150g (1 1/4 cups) all-purpose flour, 1/2 tsp baking soda, and a pinch of salt.
- Gradually fold the dry ingredients into the wet, just until no streaks remain. Avoid overmixing—this keeps cookies tender.
- Stir in 150g (about 1 cup) chocolate chips—use a mix of milk and dark for complexity, or just your favorite.
- Chill the dough for at least 30 minutes, or up to 24 hours if you plan ahead. Wrap in plastic if refrigerating overnight.
- Scoop dough with a tablespoon or small ice cream scoop—about 2 tbsp per cookie—and space them 2 inches apart on the prepared sheet.
- Bake in the oven for 10-12 minutes. Look for edges that are golden and a slightly soft center—cookie jiggle is okay.
- If cookies spread too thin or burn around edges, check oven temp, or refrigerate dough longer before baking.
- Remove from oven and let sit on the sheet for 5 minutes—cookies will firm up as they cool.
- Transfer cookies to a cooling rack. Rest for at least 10 minutes before serving—warm, gooey, and just right.
Let baked cookies rest on the cooling rack for at least 10 minutes. Serve warm or store in an airtight container once cooled.
How to Know It’s Done
- Edges are golden brown, center is soft but set.
- Chocolate chips are oozy and slightly melted.
- Cookies hold their shape but are chewy inside.
Chilled Chocolate Chip Cookies
Ingredients
Equipment
Method
- In a mixing bowl, beat together the softened butter and sugar until the mixture is light, fluffy, and slightly pale, about 2-3 minutes, and you can hear a gentle scratching sound as the sugar dissolves.
- Add the egg and vanilla extract to the bowl, then whisk or fold until the mixture becomes glossy and smooth, about 1 minute.
- In a separate bowl, whisk together the flour, baking soda, and a pinch of salt. Gradually add these dry ingredients to the wet mixture, folding gently until just combined—avoid overmixing to keep the dough tender.
- Stir in the chocolate chips, ensuring they are evenly distributed throughout the dough. It will be thick and slightly sticky.
- Wrap the bowl with plastic wrap or cover with a lid, then refrigerate the dough for at least 30 minutes, or up to 24 hours, to deepen the flavor and improve the cookie's structure.
- Preheat your oven to 180°C (350°F). Line a baking sheet with parchment paper to prevent sticking.
- Using a tablespoon or small ice cream scoop, portion out the chilled dough and place about 2 inches apart on the prepared baking sheet. Gently flatten each mound for even baking.
- Bake the cookies for 10-12 minutes, until the edges are golden brown and the centers are just set. You might hear a slight crackle on the surface as they bake.
- Remove the baking sheet from the oven and let the cookies rest for about 5 minutes; they will firm up slightly as they cool.
- Transfer the cookies to a cooling rack and let them cool completely for about 10 minutes. Now, enjoy the warm, gooey centers with crispy edges — perfect for sharing or indulging all on your own!
Notes
Pro tips for perfect cookies
- Bolded Mini-Head: Chill dough thoroughly → Cold dough spreads less, resulting in thicker, chewier cookies.
- Bolded Mini-Head: Use fresh ingredients → Fresh butter and eggs create better flavor and texture.
- Bolded Mini-Head: Measure accurately → Too much flour makes cookies dense; spoon and level for precision.
- Bolded Mini-Head: Slightly underbake → Remove when edges are golden and centers are soft for gooey perfection.
- Bolded Mini-Head: Add sea salt flakes → A pinch on top enhances sweetness and adds a delightful crunch.
- Bolded Mini-Head: Rotate baking sheet → Switch positions halfway through for even baking and uniform color.
- Bolded Mini-Head: Store in airtight container → Keeps cookies fresh, chewy, and preserves chocolate gooiness.
Common mistakes and how to fix them
- FORGOT to chill dough? Rest it in the fridge for at least 30 minutes to improve texture.
- DUMPED too much flour? Use a light hand, and measure with a spoon for accuracy.
- OVER-TORCHED cookies? Reduce oven temperature by 10°C (20°F) and check earlier.
- MISSED the salt? Add a pinch before baking to enhance chocolate flavor and balance sweetness.
Quick fixes and pantry swaps
- When dough is sticky, splash a little flour on your hands and work surface for easier handling.
- If cookies spread too much, refrigerate the dough for 15 minutes before baking to firm up.
- Patch over cracked edges with a sprinkle of extra chocolate chips for a more uniform look.
- When cookies are underbaked, simply bake them for an extra 2 minutes until edges are golden.
- Splash a tiny bit of milk onto chocolate chips during baking for extra ooze and shine.
Make-Ahead and Storage Tips
- Dough can be made a day ahead; wrap tightly in plastic and refrigerate for up to 24 hours, which deepens flavor and improves texture.
- Baked cookies stay fresh in an airtight container at room temperature for up to 3 days. For longer storage, freeze for up to a month, wrapping well to prevent freezer burn.
- Reheat cookies briefly in a 150°C (300°F) oven for 3-5 minutes until warm and gooey again, or microwave for 10-15 seconds for a quick treat. The smell of melted chocolate and baked dough will tell you they’re ready.
- heading: Make-Ahead and Storage Tips
Top questions about chocolate chip cookies
1. Why should I chill my cookie dough?
Chilling the dough slows down spreading and enhances flavor, making your cookies chewier and richer.
2. Can I use margarine instead of butter?
Yes, you can substitute butter with margarine or coconut oil, but expect slightly different texture and taste.
3. What kind of chocolate chips should I use?
Using dark chocolate chips gives a richer, more intense chocolate flavor, while milk chocolate is sweeter and creamier.
4. How do I know when the cookies are done?
Bake until edges are golden and centers are just set; they will firm up as they cool for that perfect chew.
5. How should I store leftover cookies?
Store baked cookies in an airtight container at room temperature for up to 3 days, or freeze for longer freshness.
6. How can I adjust the texture?
For softer cookies, slightly underbake by a minute; for crunchier, bake a minute longer, watching the edges.
7. Can I make these gluten-free?
Replacing some or all of the flour with whole wheat or gluten-free blends can work, but may change the texture slightly.
8. Why do chocolate chips melt so much?
Chocolate chips tend to ooze and melt into pockets of gooeyness, especially if baked at slightly higher temperatures.
9. Should I add salt on top?
Adding a pinch of sea salt flakes on top enhances the sweetness and adds a satisfying crunch to each bite.
10. Can I prepare the dough ahead of time?
Refrigerate the dough for at least 30 minutes or overnight to develop flavor and improve cookie structure.
Baking these cookies is a small act of patience that pays off in the best way. The aroma of melting chocolate and toasted butter alone makes the wait worthwhile.
Each warm, chewy bite carries a hint of nostalgia, reminding you that some simple pleasures are worth the extra step. These cookies aren’t just treats—they’re a little celebration of quiet, imperfect moments.