
This yogurt cake feels like a warm hug from childhood, a simple treat that’s been around long enough to feel familiar but still surprises with its tender crumb and subtly tangy flavor. It’s the kind of baking that doesn’t ask for fancy equipment or hard-to-find ingredients, just a handful of pantry staples and a little love. Every time I make it, I remember the afternoons I spent sneaking bites of batter while mom or grandma wasn’t looking, the kitchen filled with a comforting, yeasty aroma.
What makes this cake special isn’t just its nostalgic roots, but how effortlessly it adapts to whatever you have. A splash of lemon juice, a dash of vanilla, or even a handful of fresh berries can elevate it into something uniquely yours. It’s the kind of recipe that invites improvisation, reassuring you that sometimes the simplest ingredients can create something truly memorable.
Focusing on how this yogurt cake serves as a nostalgic bridge to childhood baking, highlighting the simplicity and comfort of ingredients that remind us of home, yet with a modern twist that makes it feel fresh and relevant today.
Nostalgic Comfort in Every Bite
- Baking this cake always takes me back to lazy Sunday mornings with the smell of fresh batter filling the house.
- I love how a splash of lemon zest brightens the tang, making each bite feel like a little celebration.
- The first slice is always a relief—the perfect balance of moist crumb and just enough tang to keep you coming back.
- When I see the golden edges crackle, I know it’s ready—no fancy test needed, just trust the smell and look.
- Sharing this with friends reminds me that simple, honest baking still creates the best memories.
The story behind this recipe
- This recipe came about during a quiet weekend when I was craving something comforting but simple. I remembered how my grandmother used to whip up yogurt cakes in her tiny kitchen, the air thick with the sweet scent of baked batter and memories that felt like a warm blanket. I started experimenting, tweaking the basic recipe with a little lemon zest and a splash of vanilla, just to see if I could make it feel fresh without losing that nostalgic charm.
- Every time I bake this cake, it’s like reconnecting with that childhood sense of wonder—how something so unassuming can bring so much joy. It’s become my go-to when I want a quick treat that tastes like a hug, but also reminds me to slow down and enjoy the simple things. It’s surprisingly forgiving, which is why I keep coming back to it, no matter how many fancy recipes I try in between.
- heading: ‘The story behind this recipe’
Historical and Cultural Notes
- This yogurt cake has roots in Mediterranean baking traditions, where yogurt was a staple for its affordability and tangy flavor.
- It gained popularity in France during the 1960s as a simple, budget-friendly dessert that could be whipped up quickly.
- The use of yogurt in baking was seen as a way to add moisture and a slight tang, balancing sweetness with acidity.
- In some cultures, this cake is called ‘Gâteau au Yaourt,’ emphasizing its origins as a humble, everyday treat.
- Quirky trivia: In France, the recipe is often written with no precise measurements, encouraging improvisation based on texture.
Ingredient breakdown: key components
- Whole milk yogurt: I prefer full-fat for richness, but low-fat works if you want a lighter cake; it keeps the crumb tender and moist, with that subtle tang you love.
- All-purpose flour: I stick to plain flour, but if you’re out, cake or pastry flour adds a softer, finer texture that melts in your mouth.
- Sugar: Regular granulated sugar is my go-to, but coconut sugar can add a caramel note—just be aware it darkens the batter and might slightly alter the texture.
- Eggs: Large eggs are reliable, but if yours are smaller, add an extra half egg to keep the batter balanced; they give structure and a tender crumb.
- Oil or melted butter: I favor neutral oil for moisture, but butter adds richness and a slightly richer flavor—either way, it keeps the cake moist and tender.
- Lemon zest or vanilla: A splash of lemon zest brightens the flavor with a citrusy pop, while vanilla adds warmth—skip if you want pure yogurt tang.
- Baking powder: I make sure it’s fresh; it’s what makes the cake rise and stay fluffy—if it’s old, the cake might be flat or dense.
Spotlight on key ingredients
Yogurt:
- Whole milk yogurt: I prefer full-fat for richness, but low-fat works if you want a lighter cake; it keeps the crumb tender and moist, with that subtle tang you love.
- All-purpose flour: I stick to plain flour, but if you’re out, cake or pastry flour adds a softer, finer texture that melts in your mouth.
- Sugar: Regular granulated sugar is my go-to, but coconut sugar can add a caramel note—just be aware it darkens the batter and might slightly alter the texture.
Flavorings & Leavening:
- Lemon zest: Fresh lemon zest adds a bright, citrusy aroma that awakens the palate; skip if you prefer a milder flavor, but don’t omit altogether if you like that zing.
- Vanilla extract: A splash of vanilla deepens the sweetness and adds warmth; it’s subtle but makes a noticeable difference in the overall flavor profile.
- Baking powder: Fresh baking powder is crucial; it’s what makes the cake rise and stay fluffy—if old, your batter might fall flat or be dense.
Notes for ingredient swaps
- Dairy-Free: Substitute coconut or almond yogurt for a creamy, tangy flavor without dairy, but expect a slightly different texture.
- Gluten-Free: Use a 1:1 gluten-free baking flour blend; the cake might be a tad denser but still moist and tender.
- Sugar Alternatives: Swap with honey or maple syrup—reduce liquid slightly to compensate, and expect a richer flavor with a hint of caramel.
- Oil Options: Replace neutral oil with melted butter for a richer crumb; olive oil adds a fruity note, but avoid overpowering flavors.
- Flavor Boosts: Add a teaspoon of cinnamon or cardamom to the dry mix for warming spice notes that complement the tang.
- Egg-Free: Use applesauce or mashed banana (about 1/4 cup) per egg—your cake will be slightly denser, with a hint of fruitiness.
- Lemon Zest: Swap lemon zest for orange or lime zest for a different citrus twist—bright, fragrant, and just as vibrant.
Equipment & Tools
- Oven: To provide consistent heat for baking.
- Mixing bowls: To combine ingredients separately for dry and wet components.
- Whisk or electric mixer: To blend wet ingredients smoothly and aerate the batter.
- Spatula: To fold dry ingredients into wet without deflating the batter.
- 20cm (8-inch) cake pan: To hold the batter and shape the cake during baking.
- Parchment paper: To prevent sticking and ensure easy removal of the cake.
- Cooling rack: To cool the cake evenly and prevent sogginess.
Step-by-step guide to baking
- Preheat your oven to 180°C (350°F). Grease a 20cm (8-inch) round cake pan and line it with parchment paper. This helps ensure easy removal and a crisp edge.
- In a large bowl, whisk together 2 cups (250g) all-purpose flour, 1 1/2 teaspoons baking powder, and a pinch of salt. Set aside; this is your dry mix to keep everything evenly distributed.
- In another bowl, combine 1 cup (240g) full-fat yogurt, 3/4 cup (150g) sugar, 3 large eggs, and 1/3 cup (80ml) neutral oil or melted butter. Whisk until smooth, about 1-2 minutes; look for a glossy, slightly frothy mixture.
- Add the zest of one lemon or a teaspoon of vanilla extract to the wet ingredients for extra flavor—stir to incorporate. If using lemon, the smell should be bright and citrusy.
- Gradually fold the dry ingredients into the wet mixture. Use a spatula, turning gently, until just combined. Do not overmix, or the cake may become dense.
- Pour the batter into your prepared pan. Smooth the top with the back of a spoon or spatula. Tap the pan lightly on the counter to settle the batter and release air bubbles.
- Bake for 30-35 minutes. Check at 30 minutes; the cake should be golden and a toothpick inserted into the center comes out clean. The top should crack slightly and smell warm and toasty.
- If the cake is browning too quickly but isn’t done, tent it loosely with foil and continue baking. If it’s not rising, check your oven temperature—may need calibration.
- Remove from oven and let cool in the pan for 10 minutes. Then transfer to a wire rack to cool completely—this prevents sogginess and helps the crust set.
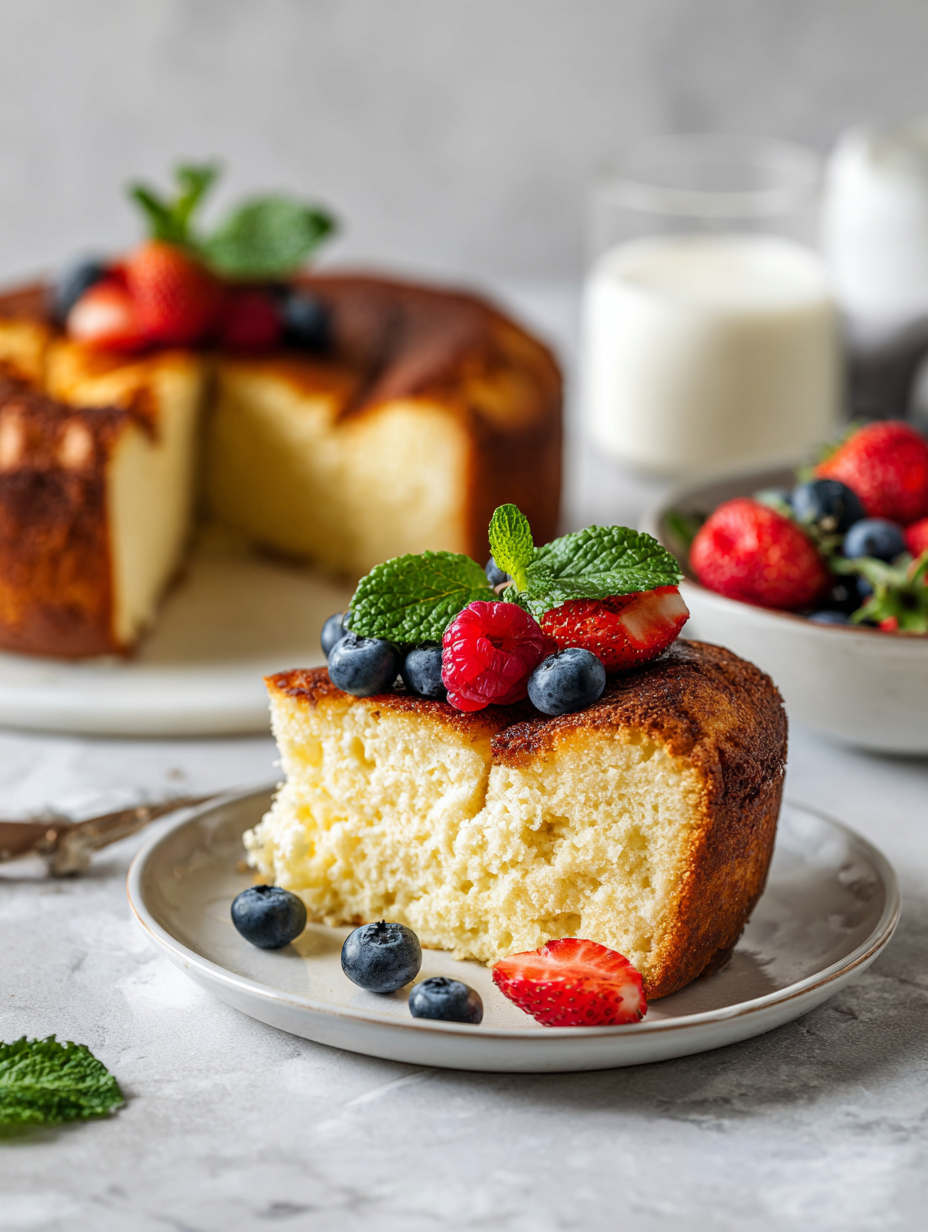
- Once cooled, optionally dust with powdered sugar or serve with fresh berries. Slice with a serrated knife for clean edges, revealing a moist, tender crumb.
Allow the cake to cool completely on a wire rack. Finish with a dusting of powdered sugar or serve directly from the pan for a rustic look. Slice once fully cooled for clean, even pieces.
How to Know It’s Done
- Golden edges and a crackled top indicate doneness.
- A toothpick inserted into the center comes out clean.
- Cake feels springy and slightly jiggly in the middle when gently pressed.
Yogurt Cake
Ingredients
Equipment
Method
- Preheat your oven to 180°C (350°F). Grease your cake pan and line it with parchment paper to prevent sticking.
- In a large mixing bowl, whisk together the flour, baking powder, and a pinch of salt to combine evenly.
- In another bowl, mix the yogurt, sugar, eggs, and oil until the mixture is smooth, shiny, and slightly frothy—about 1-2 minutes of whisking.
- Add the lemon zest and vanilla extract to the wet mixture, stirring gently to incorporate the bright citrus aroma and warmth into the batter.
- Gradually fold the dry ingredients into the wet mixture using a spatula, turning gently until just combined. Be careful not to overmix to keep the cake tender.
- Pour the batter into the prepared pan and smooth the top with a spatula. Lightly tap the pan on the counter to settle the batter and release air bubbles.
- Bake in the preheated oven for 30-35 minutes until the top is golden and cracked slightly. Check doneness by inserting a toothpick into the center; it should come out clean.
- Remove the cake from the oven and let it cool in the pan for about 10 minutes before transferring to a wire rack to cool completely. This prevents sogginess and helps set the crumb.
- Once cooled, slice the cake with a serrated knife. Serve plain or dusted with powdered sugar, and enjoy its tender, moist crumb with a hint of tang.
Tips and tricks for perfect yogurt cake
- Use room temperature eggs to achieve a smoother, more homogeneous batter that traps less air.
- Gently fold ingredients to keep the batter airy; overmixing can make the cake dense and heavy.
- Tap the filled pan on the counter to release trapped air and promote an even rise.
- Keep a close eye on the cake’s color and crackling top—these clues tell you when it’s perfectly baked.
- For a shinier crust, brush the cooled cake with a light syrup or a bit of melted butter before serving.
- If the cake edges brown too quickly, tent with foil halfway through baking to prevent over-darkening.
- Store leftovers in an airtight container at room temperature for up to 2 days, or freeze for longer storage.
Common mistakes and how to fix them
- FORGOT to check oven temperature → Use an oven thermometer for accuracy.
- DUMPED in all ingredients at once → Mix dry and wet separately before combining.
- OVER-TORCHED the top → Cover with foil if browning too fast, continue baking.
- MISSED the cooling step → Cool completely on a rack to prevent sogginess.
Quick fixes and pantry swaps
- When batter seems too thick, splash in a little milk to loosen it.
- If cake cracks excessively, lower oven temperature and bake a bit longer.
- Splash a bit of lemon juice on top if the surface browns too fast.
- Patch a dry slice with a dollop of yogurt or honey for extra moisture.
- Shield the edges with foil if they turn dark before the center is done.
Prep, store, and reheat tips
- You can prepare the batter a day in advance; keep it covered in the fridge to preserve freshness and tang.
- Store the baked cake in an airtight container at room temperature for up to 2 days; refrigerate for longer shelf life, but expect slight dryness.
- Reheat slices gently in the microwave for about 10-15 seconds until warm and fragrant—watch for a slightly spongy texture if overdone.
- The flavors deepen slightly after a day or two, enhancing the tang and moist crumb, but avoid refrigerating too long to prevent dryness.
FAQs about Yogurt Cake
1. Can I use low-fat yogurt?
Use plain, full-fat yogurt for the best moistness and tang, but low-fat works if you prefer lighter. The flavor will be slightly less rich.
2. Can I use Greek yogurt?
Yes, you can substitute Greek yogurt for a thicker, creamier texture, but reduce the liquid slightly to prevent dense batter.
3. Can I replace sugar with honey?
Absolutely, you can swap honey or maple syrup for sugar, but reduce the liquid slightly and expect a richer, more caramel-like flavor.
4. Can I make it egg-free?
Yes, you can omit eggs if needed, replacing each with 1/4 cup of applesauce or mashed banana, but the cake may be a bit denser.
5. What baking pan should I use?
Use a standard 20cm (8-inch) round cake pan; a springform pan works well too. Ensure it’s well-greased or lined with parchment.
6. How do I know when it’s done?
Bake until the top is golden, cracks slightly, and a toothpick inserted in the center comes out clean—about 30-35 minutes at 180°C (350°F).
7. Should I cool the cake before slicing?
Let the cake cool completely on a wire rack before slicing to prevent crumbling and ensure even texture.
8. How should I store leftovers?
Store leftovers in an airtight container at room temperature for up to 2 days, or refrigerate for 4-5 days. Reheat slices briefly in the microwave for softness.
9. What if my cake cracks?
If the cake cracks on top, gently cover with a dusting of powdered sugar or serve with fresh berries to hide imperfections.
10. What if my batter is too thick?
When batter seems too thick, add a splash of milk or yogurt to loosen it for easier mixing and a lighter crumb.
Baking this yogurt cake reconnects me to simpler times, where comfort came from modest ingredients and honest effort. The smell of warm lemon and toasted edges feels like a quick trip back home, no matter where I am. It’s a reminder that sometimes, the most unassuming recipes carry the most warmth.
Sharing this cake with others keeps that nostalgic feeling alive, a little piece of childhood baked into each slice. No matter the occasion, it’s about the joy of simple baking—fluffy, tangy, and just a bit imperfect. That’s what makes it worth coming back to, again and again.