
Bran muffins often get a bad rap for being dull, but I’ve found they can be surprisingly adaptable. They’re not just breakfast or snack food—think of them as a blank canvas. You can dress them up with fruit, nuts, or even chocolate chips, making each batch feel new and satisfying in a different way.
Over the years, I’ve played around with different twists—adding spices, swapping out some flour, or trying different sweeteners. It’s a simple recipe, but with a little creativity, they turn into something more than just a health kick. Plus, they’re quick to whip up on busy mornings or when you need a comforting treat that feels genuinely nourishing.
Focusing on how bran muffins can be a surprisingly versatile snack that fits into busy mornings, with variations that make them feel indulgent or nourishing depending on your mood.
Unexpected uses for bran muffins
- I used to think bran muffins were just health food, but then I discovered how versatile they can be—sometimes I add blueberries or a sprinkle of cinnamon just to jazz them up.
- Baking these takes me back to my grandmother’s kitchen—her comforting smell of toasted oats and warm spices still lingers in my mind.
- There’s a strange pride in turning humble bran into something I actually look forward to eating, especially when I get that perfect, slightly crispy top.
- Sometimes I feel guilty about how quick they are to make—like I’m cheating the system—yet they turn out hearty and satisfying every time.
- Honestly, the best part is how they keep me going through busy mornings, knowing I’ve got a nourishing snack ready in minutes.
The story behind this recipe
- This recipe came from a box of old cookbooks I found tucked away in a cluttered cabinet. I remember the smell of toasted grains and the slight chewiness of the bran that first drew me in, making me want to recreate that simple comfort at home.
- Initially, I was just looking for a quick breakfast option that wouldn’t feel like a health lecture. Over time, I realized how adaptable and forgiving this recipe can be—whether I add a handful of raspberries or a pinch of cinnamon, it always feels personal.
- Baking these reminds me of lazy weekend mornings, when the house smells warm and cozy, and I feel a small sense of accomplishment for turning humble ingredients into something hearty and satisfying.
Historical and Cultural Insights
- Bran muffins gained popularity during the health food movement of the 1960s, touted for their fiber content and digestive benefits.
- Originally, they were seen as a remedy for constipation, with recipes emphasizing the use of bran as a natural laxative.
- In the early days, commercial bran muffin mixes became a staple in American households, often sweetened with molasses or honey for added flavor.
- The concept of adding whole grains like bran to baked goods reflects a long-standing tradition of using simple, hearty ingredients to boost nutrition.
- Today, bran muffins have evolved into a versatile snack, appreciated both for their health benefits and their ability to be customized with various add-ins.
Ingredient breakdown
- Whole wheat bran: I love the nutty, coarse texture it adds—gives the muffins a hearty bite. Feel free to sift it if you want a smoother crumb.
- All-purpose flour: It keeps the muffins tender; skipping it makes them dense. Consider using half white, half whole wheat for extra flavor.
- Brown sugar: I prefer dark for that molasses warmth—tastes like a cozy hug. For a less sweet version, cut back slightly or swap with honey.
- Baking powder: This is your leavening magic—when it fizzes, you know they’re about to rise beautifully. Make sure it’s fresh for max lift.
- Milk: I use whole for richness, but almond or oat milk work well too—just expect a slightly different flavor and texture, maybe a tad lighter.
- Vegetable oil: Keeps them moist and tender—think of it as the glue. Try applesauce if you want to cut fat without sacrificing moisture.
- Optional add-ins: Nuts, berries, or a handful of chocolate chips—whatever makes your heart sing. Just fold them in at the end for a burst of flavor.
Spotlight on key ingredients
Whole wheat bran:
- I love the nutty, coarse texture it adds—gives the muffins a hearty bite. Feel free to sift it if you want a smoother crumb.
- Feel the rough, fibrous nature of bran—it’s what makes these muffins satisfyingly chewy and rustic.
Brown sugar:
- I prefer dark for that molasses warmth—tastes like a cozy hug. For a less sweet version, cut back slightly or swap with honey.
- The deep, caramel notes of brown sugar caramelize slightly during baking, creating a rich, oozing top that’s just irresistible.
Notes for ingredient swaps
- Dairy-Free: Swap milk for almond, soy, or oat milk. It won’t be as creamy but still moist and flavorful.
- Gluten-Free: Use a blend of gluten-free flours like rice, tapioca, and potato starch. Expect a slightly denser crumb.
- Sweetener: Replace brown sugar with honey, maple syrup, or coconut sugar. Adjust the liquids slightly if needed.
- Oil: Substitute with applesauce or mashed banana for reduced fat and added moisture. Expect a softer texture.
- Add-ins: Use dried fruits, seeds, or sugar-free chocolate chips. Feel free to skip for a simpler muffin.
Equipment & Tools
- Mixing bowl: To combine dry and wet ingredients.
- Whisk: To mix wet ingredients smoothly.
- Spatula: To fold ingredients gently and scrape batter.
- Muffin tin: To shape and bake the muffins.
- Paper liners or non-stick spray: To prevent sticking and make removal easier.
- Oven: To bake the muffins at even heat.
Step-by-step guide to bran muffins
- Gather your equipment: a mixing bowl, a whisk, a spatula, a muffin tin, and paper liners or non-stick spray. Preheat your oven to 180°C (350°F).
- In a large bowl, combine 1 cup of whole wheat bran, 1 cup of all-purpose flour, and ½ cup of brown sugar. Mix well to distribute evenly.
- In a separate smaller bowl, whisk together 1 cup of milk, ¼ cup of vegetable oil, and 1 large egg until smooth and slightly frothy.
- Pour the wet ingredients into the dry ingredients. Gently fold with a spatula until just combined. Do not overmix; lumps are okay.
- If adding extras like nuts, berries, or chocolate chips, fold them in now, ensuring even distribution without overworking the batter.
- Spoon the batter into the muffin tin, filling each cup about ¾ full. Smooth the tops with the back of a spoon if needed.
- Bake in the preheated oven for 20-25 minutes. Check around 20 minutes; muffins should be golden and spring back when lightly pressed.
- To test doneness, insert a toothpick into the center of a muffin. It should come out clean with no wet batter attached.
- Remove muffins from the oven and let them rest in the tin for 5 minutes. Then transfer to a wire rack to cool slightly before serving.
- Finish with a light dusting of cinnamon or a drizzle of honey if desired. Serve warm or at room temperature.
Allow muffins to cool in the tin for 5 minutes, then transfer to a wire rack to cool completely. Serve warm or at room temperature, perhaps with a pat of butter or a smear of jam for extra comfort.
How to Know It’s Done
- Muffins are golden brown and spring back when pressed lightly.
- Toothpick inserted in the center comes out clean, with no wet batter.
- Muffins release easily from the tin and have a slightly crispy top.
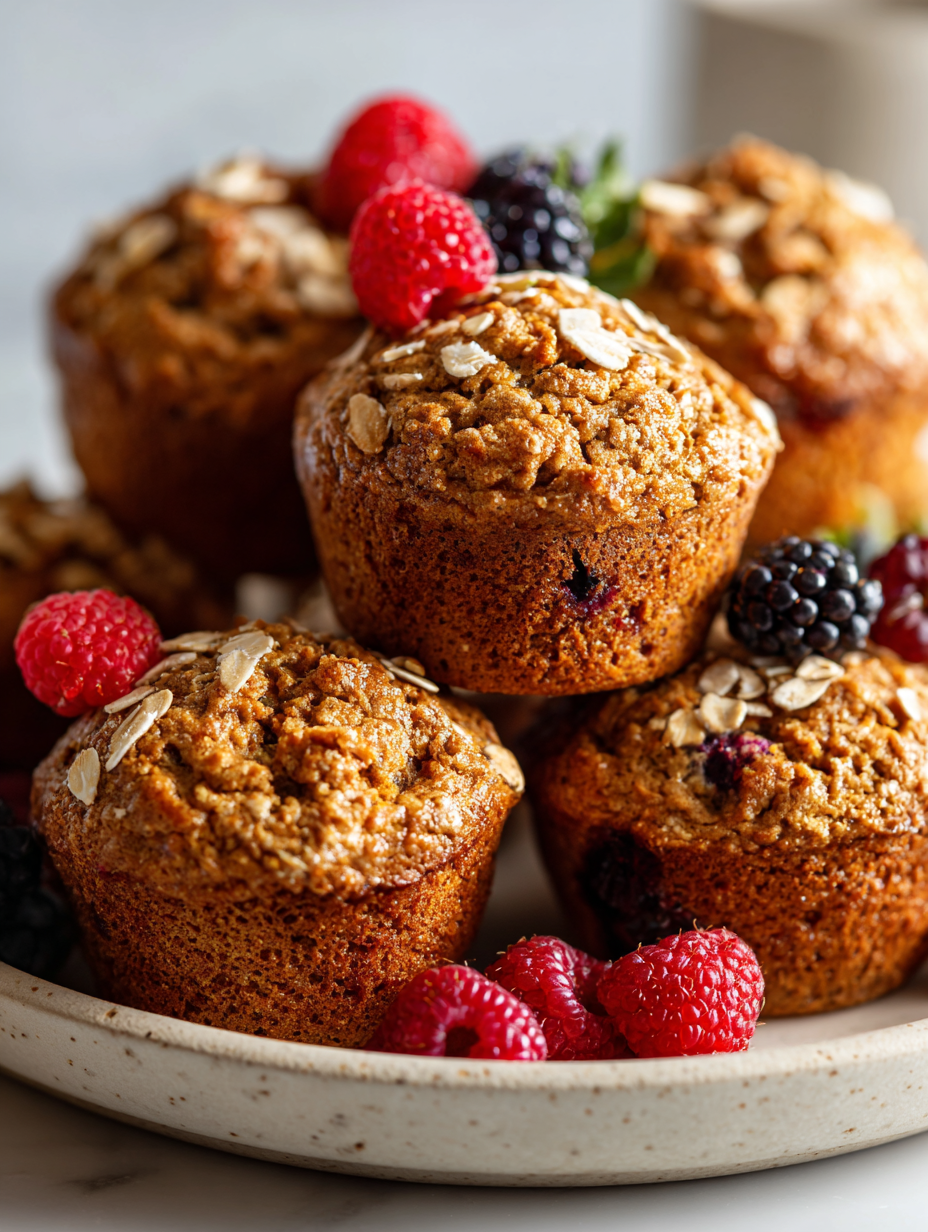
Versatile Bran Muffins
Ingredients
Equipment
Method
- Preheat your oven to 180°C (350°F) and line your muffin tin with paper liners or lightly spray with non-stick spray.
- In a large mixing bowl, combine the whole wheat bran, all-purpose flour, and brown sugar. Stir until evenly mixed, creating a coarse, crumbly mixture.
- In a separate bowl, whisk together the milk, vegetable oil, and egg until the mixture is smooth and slightly frothy, filling your kitchen with a gentle, milky aroma.
- Pour the wet mixture into the bowl of dry ingredients. Gently fold everything together with a spatula until just combined; the batter should be slightly lumpy and moist, not overmixed.
- If desired, fold in any optional add-ins like nuts, berries, or chocolate chips, distributing them evenly without overworking the batter.
- Spoon the batter into your prepared muffin cups, filling each about three-quarters full. The batter will be thick but scoopable, and the tops will look slightly domed.
- Bake in the preheated oven for 20 to 25 minutes, until the muffins are golden brown on top and feel firm when gently pressed. Your kitchen will fill with a warm, toasty smell.
- Insert a toothpick into the center of a muffin; if it comes out clean, the muffins are ready. If not, bake for a few more minutes and check again.
- Remove the muffins from the oven and let them cool in the tin for about 5 minutes. Then transfer them to a wire rack to cool slightly or enjoy warm.
- Once cooled, serve your muffins plain, with a pat of butter, or a drizzle of honey. They’re perfect for a quick breakfast or a nourishing snack on the go.
Notes
Pro tips for perfect bran muffins
- Use fresh baking powder for maximum lift; it fizzes quickly, ensuring fluffy muffins.
- Gently fold wet into dry—overmixing develops gluten, making muffins dense, not tender.
- For a moist crumb, don’t overbake—start checking at 20 minutes; they should be golden and slightly springy.
- Add a splash of vanilla or cinnamon for a flavor boost—small tweaks make a big difference.
- Use muffin liners for easy removal and cleaner presentation—prevents sticking and crumbling.
- Rest muffins in the tin for 5 minutes post-bake—helps set the crumb and makes handling easier.
Common mistakes and how to fix them
- FORGOT to measure flour precisely → Use spoon and level for accuracy.
- DUMPED batter into hot oven → Preheat oven fully before baking.
- OVER-TORCHED muffins → Check at 20 minutes, cover edges if browning too fast.
- UNDERSOLD muffins → Insert toothpick; if it comes out wet, bake a few minutes longer.
Fast fixes for common muffin mishaps
- When batter is too thick, splash in a bit more milk to loosen it.
- If muffins are flat, ensure your baking powder is fresh and oven is preheated.
- Dumped batter on a hot pan? Quickly lower oven temperature to prevent over-browning.
- Over-torched edges? Shield with foil and lower heat for even baking.
- Splash some lemon juice or vanilla to brighten bland muffins mid-bake.
Prep, store, and reheat tips
- Prep the batter the night before—cover tightly and refrigerate. The flavors meld overnight, and the batter thickens slightly, making for an easier scoop in the morning.
- Muffins can be stored in an airtight container at room temperature for up to 2 days. Expect the texture to soften a bit, with the tops losing some crispness but still moist inside.
- For longer storage, freeze baked muffins in a single layer, then transfer to a zip-top bag. They keep well for up to 3 months and can be reheated directly from frozen.
- Reheat muffins in a 180°C (350°F) oven for about 10 minutes until warm and fragrant. You’ll notice the aroma of toasted grains and a slight crackle on the crust.
- To revive refrigerated muffins, microwave for 15-20 seconds. They should steam gently, with the center just warm enough to soften the crumb and bring back some moisture.
Top questions about bran muffins
1. How long do bran muffins stay fresh?
You can store baked muffins in an airtight container at room temperature for up to two days. For longer storage, freeze them and reheat when needed.
2. Can I make bran muffins oil-free?
Yes, you can substitute applesauce or mashed banana for the oil to make them healthier and more moist.
3. What mix-ins work best for bran muffins?
Adding dried fruits like cranberries or raisins can boost sweetness and texture, but cut back on sugar if you do.
4. Why are my muffins flat and dense?
Use fresh baking powder to ensure the muffins rise properly. Old powder can lead to flat, dense muffins.
5. Can I use different flours in this recipe?
You can swap whole wheat flour for all-purpose, but expect a slightly denser texture and nuttier flavor.
6. My batter is too thick. What do I do?
If the batter looks too thick, stir in a splash more milk until it reaches the right consistency.
7. How do I know when the muffins are done?
Bake until the muffins are golden, a toothpick comes out clean, and they feel springy to touch.
8. How can I enhance the flavor of my muffins?
You can add a teaspoon of vanilla or cinnamon for extra flavor. Just fold it into the wet ingredients.
9. How do I reheat bran muffins?
Reheat muffins in a 180°C (350°F) oven for about 10 minutes or microwave for 15-20 seconds for a quick warm-up.
10. Can I prepare the batter in advance?
Yes, you can make the batter ahead of time, cover, and refrigerate overnight for a quick morning bake.
Making these bran muffins is a small act of kindness for my mornings. The warm smell of toasted grains and the hearty bite of the bran always remind me to keep it simple. It’s not just about nourishment; it’s about carving out a moment of comfort in a busy day.
In the end, what matters most is that these muffins feel like a little win—something I can rely on when I need a quick, satisfying bite. And honestly, they’re the kind of humble treat that keeps me coming back, no fuss, just good food and good memories.